Ready to create a YouTube channel that brings your community together, drives engagement, and supports your business goals?
With the right strategy, YouTube can be a powerful tool to help you connect with your audience and build brand loyalty.
And the best part is you don’t need a big budget to deliver big results!
To help you get started, we’re sharing everything you need to know to create a YouTube channel:
Table of Contents
Why Create a YouTube Channel for Your Business?
With over 70% of adults in the US using YouTube, there’s no denying that it’s a powerful platform for businesses to connect with potential customers.
Here are 4 key reasons why YouTube could be a valuable addition to your marketing strategy:
#1: Reach New and Relevant Audiences
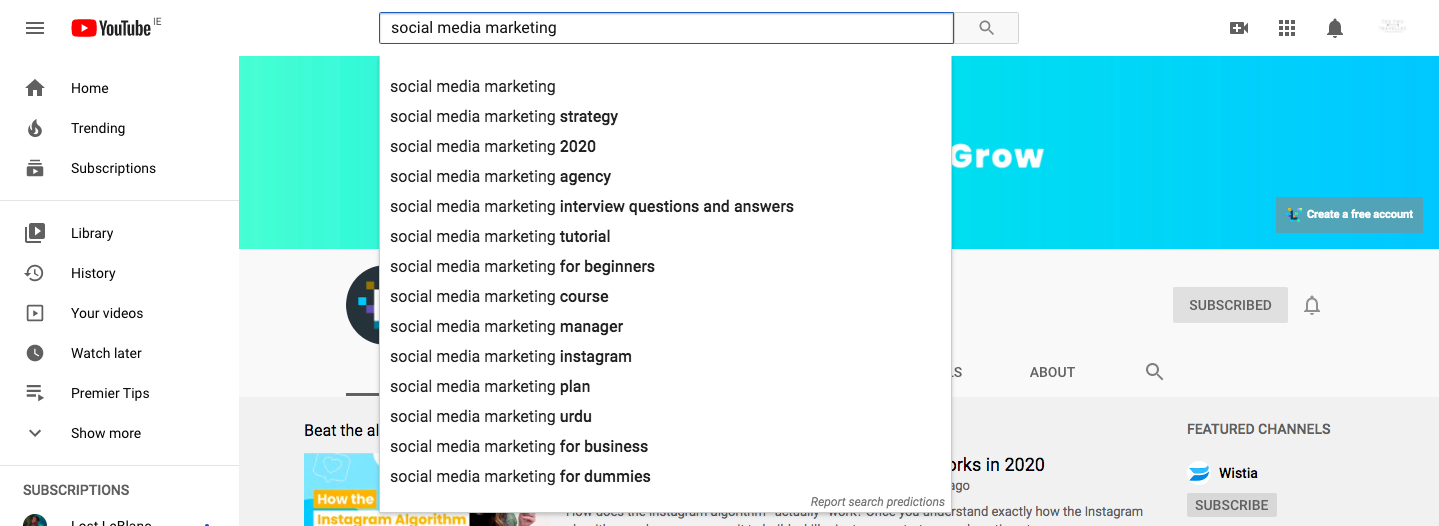
Unlike social networks like Instagram and Twitter, YouTube is a search engine. In fact, it’s the world’s second-largest search engine after Google, processing over 3 billion searches every month.
So what does this mean for your business? Well, with the right search engine optimization (SEO) strategy, it means you can reach a limitless number of new, engaged viewers who are searching YouTube for inspiration or entertainment.
It also means that your video content has a much longer shelf life than it does on other social platforms, making it more valuable for your business over time.
#2: Build a Stronger Community
As YouTube is primarily a search engine, users who search for and discover your content are more likely to have a strong interest in the topic and a genuine intent to engage.
According to a study by YouTube, people care much more about whether a video relates to their interests rather than whether it features a celebrity — which means you can build an audience that has a real, authentic passion for your brand’s area of expertise.
And it doesn’t matter how niche your point of view is. From online gaming to 3D printing, there’s an engaged community on YouTube just waiting to be tapped in to.
Take GoPro for example. They’ve built a huge and thriving community of sports enthusiasts by sharing action footage and interactive challenges on YouTube.

Their #GoProMillionDollarChallenge had over 42,000 video submissions in just 4 months, with the winning 45 creators each receiving $22,222 and a coveted spot in their “best of” showreel.
#3: Share Longer Form Content That Supports Your Brand Values
Unlike most social platforms, YouTube allows you to share longer form videos, with a huge maximum upload file size of 128GB (or 12 hours!).
This means you can dig much deeper into your chosen subject matter, and you can really let your audience get to know the people behind your brand.
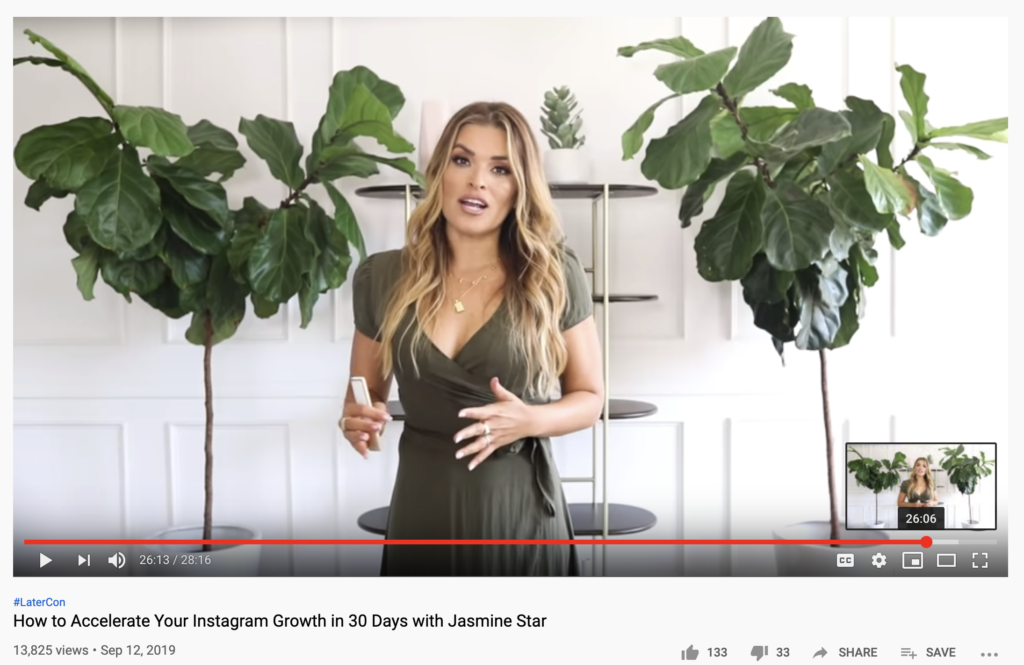
What’s more, the appetite for long-form content is much stronger on YouTube. According to Alexa, YouTube visitors spend an average of 12 minutes 52 seconds per day on the site!
#4: Drive Traffic Back to Your Site
If you’re looking to convert your audience into customers, starting a YouTube channel could be a great idea for your business.
Not only are all of the links in your video description box fully clickable, but you can also add suggested reading links and clickable pop-up buttons throughout your video:
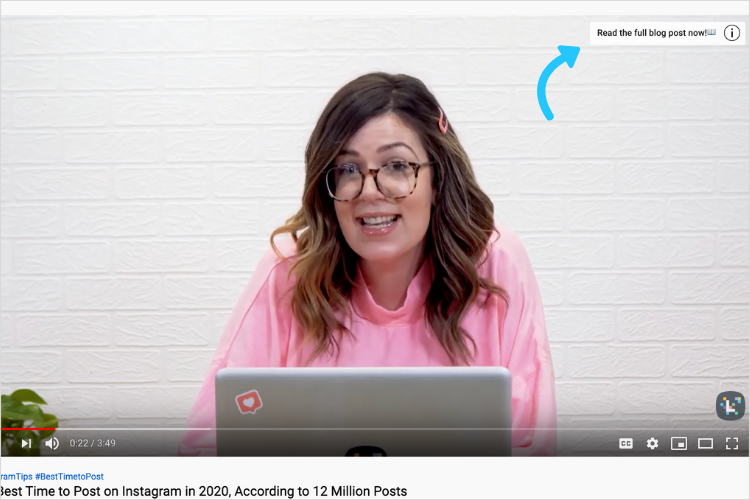
This can be a seriously effective way to cross-promote and grow your social channels, like Instagram or Facebook, and it also offers a timely way for your viewers to discover and shop your products!
Ready to take your social media strategy to the next level? Subscribe to Later’s YouTube channel for social media courses, tips, and more!
How to Create a YouTube Channel: A Step-by-step Guide
If you’re completely new to the world of YouTube, the good news is that it’s really easy to create a new channel and start sharing your video content.
To help you get started, we’ve put together a step-by-step guide on how to create a YouTube channel:
Step #1: Create Channel
In order to create a YouTube channel, you’ll need to sign into a Google account first. Tap the “Sign In” button at the top right of the screen to do this.

Once signed into a Google account, you’ll see the option to “Create Channel” under your profile.
By selecting “Create Channel,” you’ll be guided through a quick set-up process. Simply click “Get Started” to get going!
Step #2: Name Your Channel
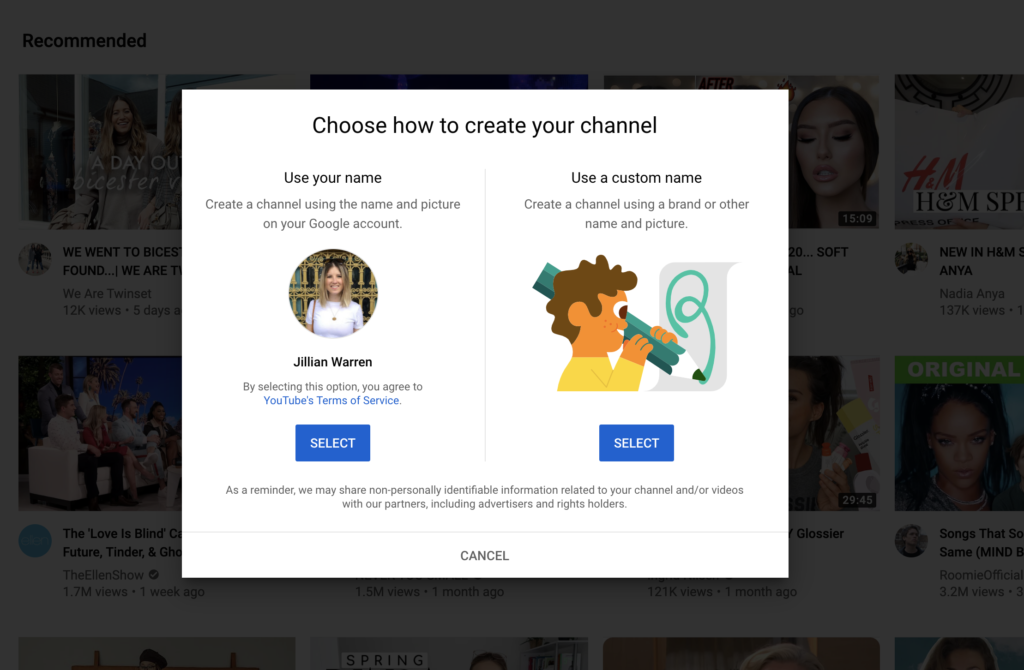
Next up, it’s time to choose how to create your channel. You can either use the name and picture associated with your Google account, or create a channel using a brand or other name and picture.
Step #3: Add a SEO-boosting Channel Description
Now you’ve created a channel, it’s time to start making it as discoverable as possible — and your channel description is a great place to start!
Write a detailed description that covers what your channel is all about, weaving in as many relevant keywords (that viewers are most likely to search for) as possible.
Once you’re happy with your channel description, you can also add links to your website and social media channels. These links will show in your About page and in the header image of your channel, which is great for cross-promoting all of your publishing channels!
Step #4: Customize Your Channel
Much like when you create a website for your business, it’s important to add the extra details that make your YouTube channel look more professional and on-brand.
Select “Customize Channel” to set up the all-important details, like a branded header image. To do this, tap “Add channel art” and upload your chosen image. The recommended channel art size is 2560px x 1440px, and the maximum file size is 6MB.

Once you’re happy with your channel art, head over to the About tab and add an email for business inquiries, location, and make any final tweaks to your channel description.
Step #5: Start Sharing Videos
Now you’ve covered the basics, you can finally start uploading video content to your channel!
Click the “Upload Video” button on the Home tab to get started:
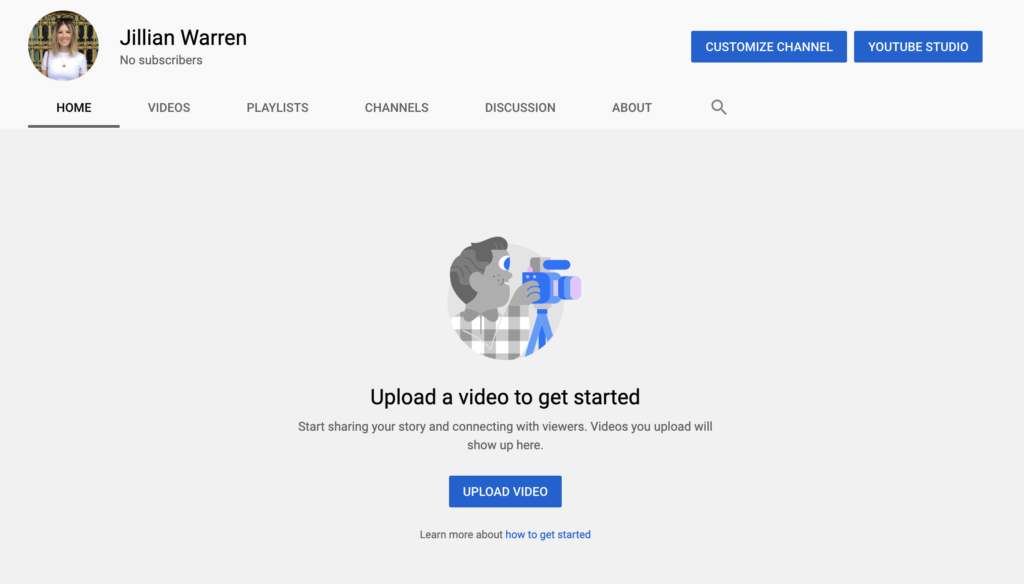
Select or drag and drop a file from your computer to upload your first video. It will be automatically set to private until you’re ready to share it with the world.
TIP: YouTube prefers high-definition videos and, in general, you should upload videos with a minimum resolution of 1920 x 1080. The optimal aspect ratio is 16:9 for YouTube.
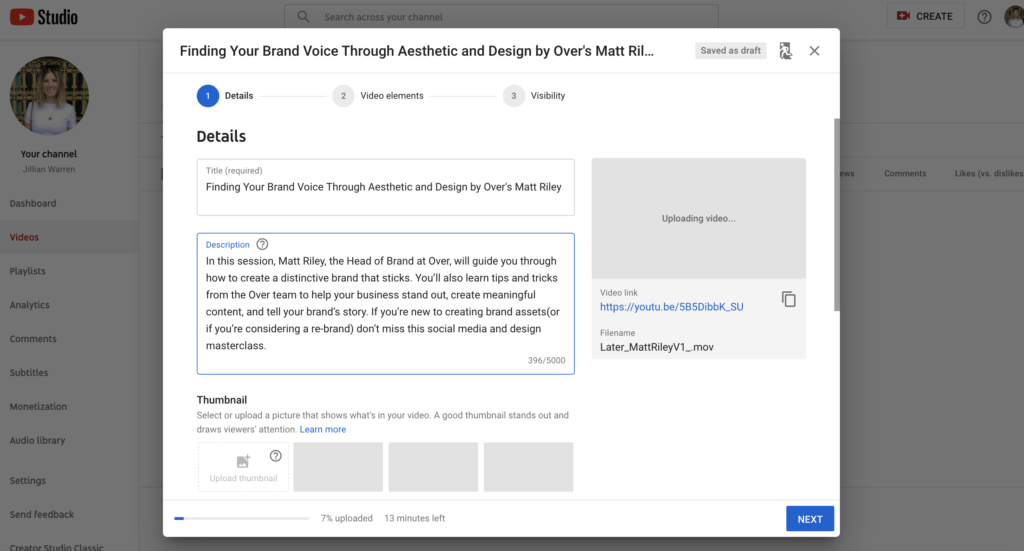
While your video uploads, you can start filling out your video title and description. These are two important fields for your SEO strategy, so it’s worth spending a little time thinking about what people might search for if they want to discover your content.
Once your video is uploaded, you can choose from one of 3 auto-generated thumbnails from the video, or upload your own custom design.
Uploading your own thumbnail is often the best option, as you have more control over the image quality. You can also add eye-catching text overlays to encourage more video clicks.
At Later, we add custom thumbnails to all of our videos to create a cohesive aesthetic that instantly tells viewers what our videos are all about:

Once you’ve set your thumbnail, select a playlist for your video to live in (optional), and select if your content is for kids or not.
Open the advanced options to indicate if your video is part of a paid promotion, add search-assisting tags, select your video’s language and, if needed, a caption certification.
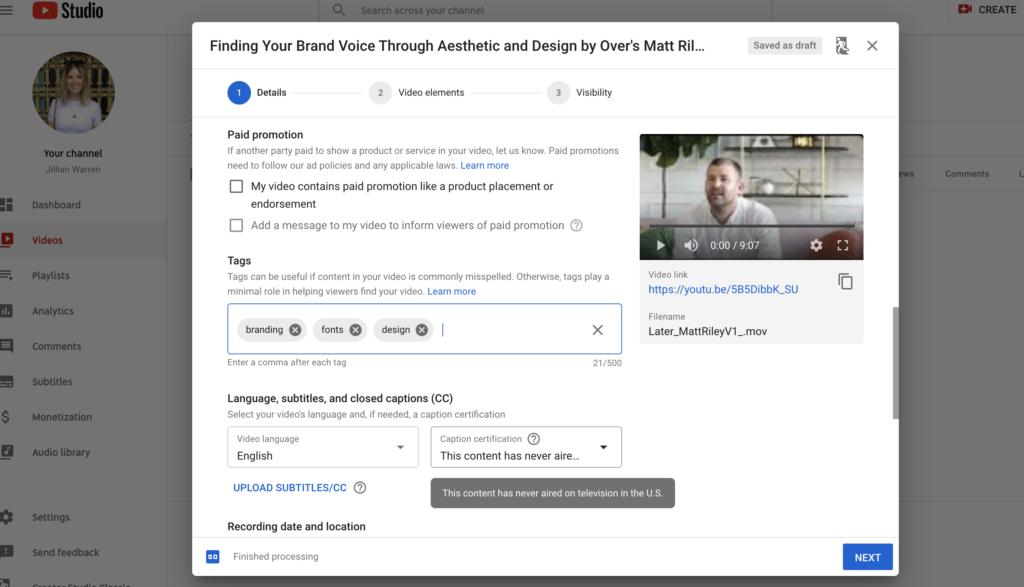
You can also select the correct license type, add a video category for extra discoverability, and enable or disable comments from this screen.
Next up, it’s time to add video elements to drive as much traffic as possible from your new YouTube video:

Video elements are available in the form of a clickable end screen and cards that appear during your video.
Select “Add an end screen” and choose from one of the templates to add to your video:
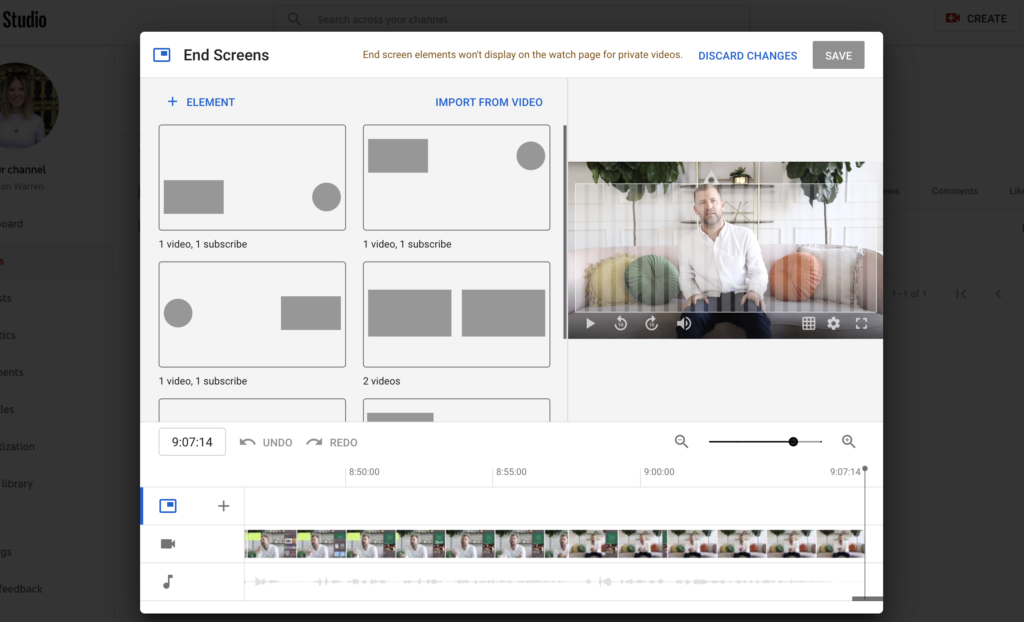
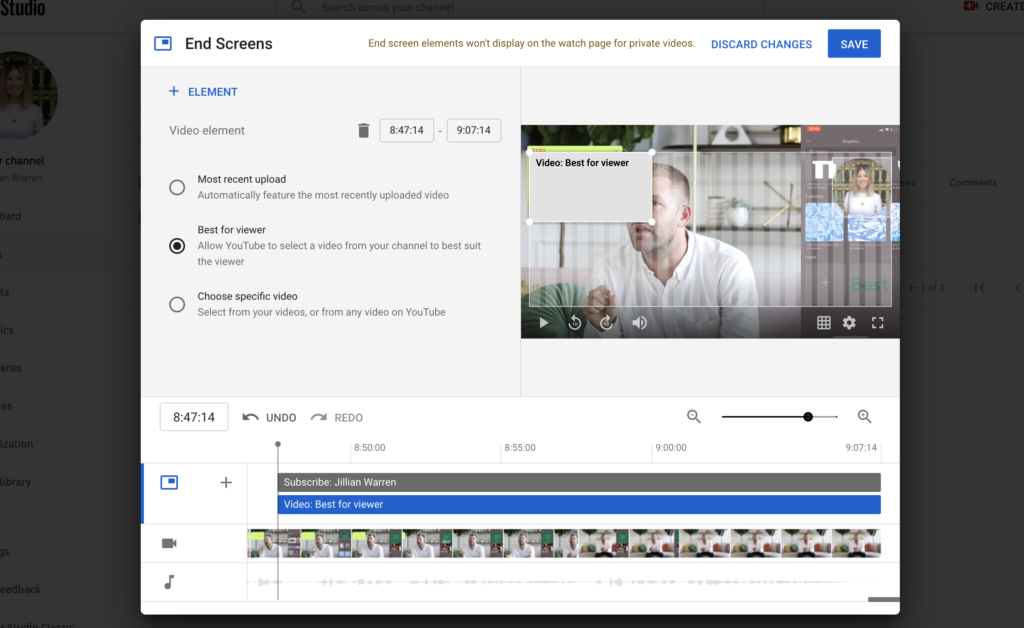
You can adjust the time period that your end screen is available, and also select which video is presented to the viewer. You can choose from your most recent upload, an auto-generated video based on the YouTube algorithm, or a specific video.
For pop-up cards, you can add prompts for a YouTube video or playlist, channel, poll, or a link to your website throughout your video — simply select a time point and add a card:

NOTE: You have to be accepted onto YouTube’s Partner Program before you can link to your website from your YouTube video cards. The eligibility criteria for this is:
Follow all the YouTube monetization policies.
Live in a country or region where the YouTube Partner Program is available.
Have more than 4,000 valid public watch hours in the last 12 months.
Have more than 1,000 subscribers.
Have a linked AdSense account.
Finally, adjust the visibility of your video and hit save. You can select from Public, Unlisted, or Private, or schedule a date to make your new video public.
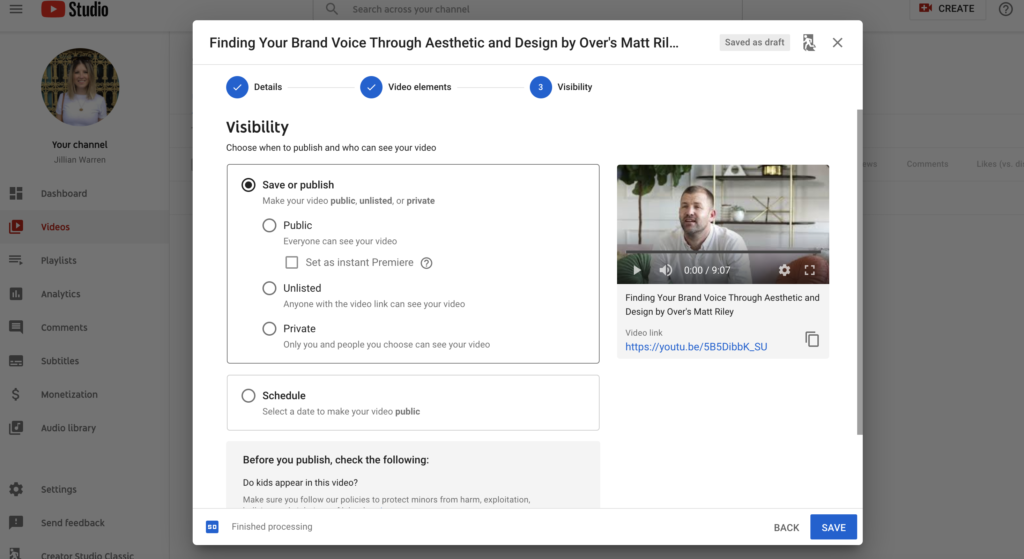
And that’s it, your video is now ready to go into the wild!
How to Make Awesome YouTube Videos on a Budget
Creating great YouTube videos might seem like a big, expensive task, but it doesn’t have to be!
If you’re not sure where to start, here are 7 top tips for making great YouTube videos on a limited budget:
Tip #1: Have a Clear Area of Specialty
Before you jump into planning your first YouTube video, it’s important to have a clear idea of what your channel is about and who it’s for.
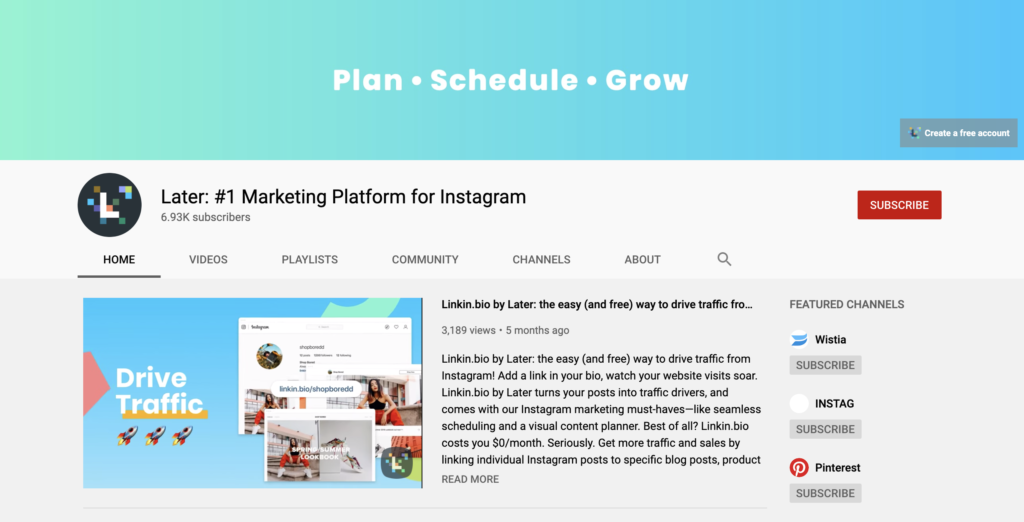
The more you understand what your channel is all about, the more your visitors will — and having a clear value will make it much easier for people to trust your content and hit subscribe.
But that’s not to say you can’t expand into new verticals over time. You can create playlists for new, related series of content. For example, if your business specializes in kitchen appliances, it could make sense to have one playlist dedicated to product reviews, one for recipe ideas, and one for appliance cleaning hacks.
Tip #2: Script and Storyboard Your Videos in Advance
When it comes to shooting video content, preparation is everything.
One of the best ways to plan your YouTube video is to think of it as having a beginning, middle, and an end — or more specifically, an introduction, focal point, and a conclusion.
Scripting and storyboarding your video in advance will keep your shoot on track, and keep your production costs to a minimum. Plus, it means you can take a step back and review if your content hits all of your business goals before the camera starts rolling!
Once you’ve scripted your video, be sure to have a quick test run reading it out loud. This will help you get into the flow of the script, and identify any stumbling points sooner rather than later.
Tip #3: Create a Studio Space
Planning the location and lighting for your video can have a huge impact on how professional your broadcast looks.
Consider how the backdrop of your video supports your brand’s message. At Later, the team uses a minimal white wall, a desk, plenty of plants, and a few pastel accessories to set the tone for our educational content.

If your brand is fun and playful, consider how to reflect that with your use of color. For example, a bright pop of pastel can instantly make your channel feel more on brand.
In terms of lighting, natural light is always the most affordable (and sometimes the best) option. If you’re able to use natural light from a window or actually be outside, this can look just as good as an expensive lighting set up.
If natural light isn’t an option for you, you still don’t have to break the bank on expensive equipment. You could always hire equipment for a day or a dedicated videographer to make the process more efficient and affordable.
Tip #4: Shoot with Multiple Platforms in Mind
Creating good YouTube videos takes time and effort, so it’s definitely worthwhile giving yourself the option to use your video footage on other platforms too.
But here’s where it gets tricky. YouTube videos are designed to be viewed in a horizontal format, whereas most other social media platforms are optimized for vertical viewing.
To combat this, consider leaving white space in the outer thirds of your YouTube video, so you can easily crop and repurpose your content — without compromising on quality.
At Later, we use an interesting but non-essential backdrop to fill the outer thirds of the shot:

TIP: Try shooting your YouTube video on two cameras at the same time, even if they’re both mobile phones!
By positioning one camera directly in front of the subject and having another at a different angle, you’ll give yourself twice as much footage to play with in the edit. This can be great for adding variety to your video and making your finished edit look more professional.
And before you finish shooting for the day, remember to collect some cutaway shots — like a close-up of someone’s hands or featured products. Not only is this great for shot diversity, but it can helps cover unwanted bloopers in the edit.
Tip #5: Introduce Branded Elements
If you’re wanting to take your YouTube videos to the next level, it could be a good idea to introduce some branded elements.
This could be as simple as having cue cards in your brand color palette, holding a branded mug, or choosing a backdrop that fits with your creative aesthetic. All simple touches that can make your videos look that little bit more professional.
And this doesn’t have to be expensive to be effective. Take note of how plant brand Patch uses a lightbox and a felt letter board to add some subtle branding to their content:

In addition to your physical branding, you should also consider how your branding is reflected in your video edits. Having a consistent font identity and color palette in your video graphics can seriously elevate your brand on YouTube.
Tip #6: Design Eye-catching Thumbnail Images
As we covered earlier in the blog post, YouTube is a visual search engine.
So with this in mind, an eye-catching thumbnail that teases the value of your content can make all the difference when it comes to your video’s view count.
Take note of how social media coach and entrepreneur Vanessa Lau uses easy to read, attention-grabbing text overlays on all of her YouTube video thumbnails, often paired with an emotive reaction:
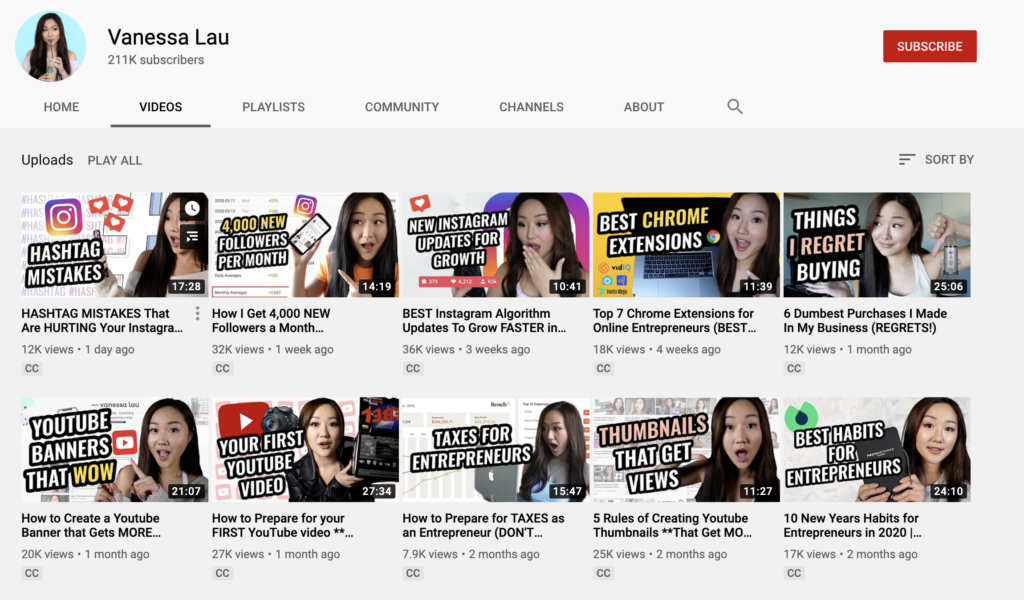
Your video thumbnail is the best way to entice people on YouTube to click play, so it’s worth keeping text clear and easy to read. Having a consistent design can also reassure viewers that your content is well-produced, professional, and therefore reliable.
Looking to level up your video graphics on YouTube? Watch our free video tutorial with Over’s Matt Riley: Finding Your Brand Voice Through Aesthetic and Design
Tip #7: Optimize for SEO
When it comes to YouTube, having a good SEO strategy is important as it can make your video views skyrocket!
The YouTube algorithm is highly advanced, so stuffing multiple keywords into your video titles, description, and tags could actually harm your video performance. Instead, pick just one keyword to optimize your content around, and then add relevant synonyms to your video description.
Consider what your audience is most likely to be searching for when you decide your keywords. For example, “tips,” “tutorials,” and “how to,” will often perform better than “lists,” “guides,” or “templates.”

Always give your video file a relevant title with a search keyword before uploading it to Youtube, and keep in mind that the first 24-48 hours of your video upload helps determine for its ranking with the YouTube algorithm.
With this in mind, it’s a good idea to cross-promote your video when it’s published so you can boost your view count as soon as possible.
Manage Your Videos with YouTube Studio
If you’re ready to take your video strategy to the next level, you might want to check out YouTube Studio!
YouTube Studio is full of helpful tools to help you get the most out of your videos — you can bulk edit your videos, delve into analytics, manage comments, review and edit subtitles, monetize videos, and browse and download free music.

Subtitles are important for making your video accessible to everyone, including those who have hearing impairments.
YouTube will automatically add subtitles to your video if you select a language during the upload process, but that’s not to say it will always be 100% accurate.
With YouTube Studio, you can review the transcription and set timings, so you always have perfect subtitles for your community to read.
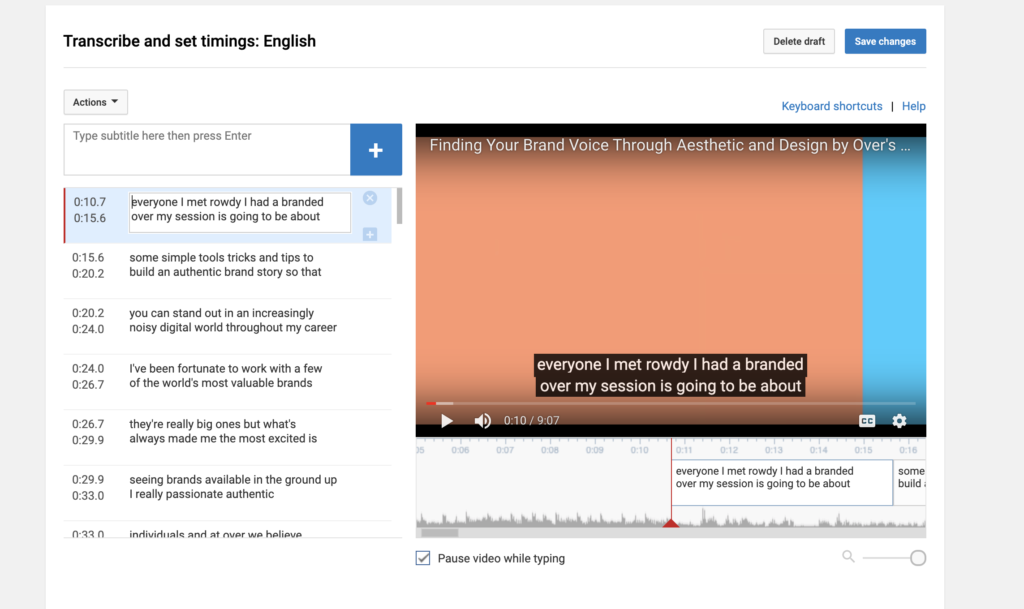
When it comes to monetizing your videos, you must be accepted onto YouTube’s Partner Program. Once approved you can use YouTube Studio to gain access to a range of monetization tools, including:
Advertising Revenue: Get ad revenue from display, overlay and video ads.
Channel Memberships: Your members make recurring monthly payments in exchange for special perks that you offer.
Merchandise Shelf: Your fans can browse and buy official branded merchandise that’s showcased on your watch pages.
Super Chat & Super Stickers: Your fans pay to get their messages highlighted in chat streams.
YouTube Premium Revenue: Get part of a YouTube Premium subscriber’s subscription fee when they watch your content.
YouTube is a great addition to your overall social media strategy, and can be one of the best ways to build a loyal and engaged audience with real purchasing power.
So if you haven’t created a YouTube channel for your business yet, now is a great time to get started! It’s a cost-effective strategy that could have a serious pay off for your business!
Ready to jump-start your social media strategy? Start planning and scheduling your Instagram, Facebook, and Twitter posts with Later for free today!
